Installing Vagrant and VirtualBox
Last Updated:
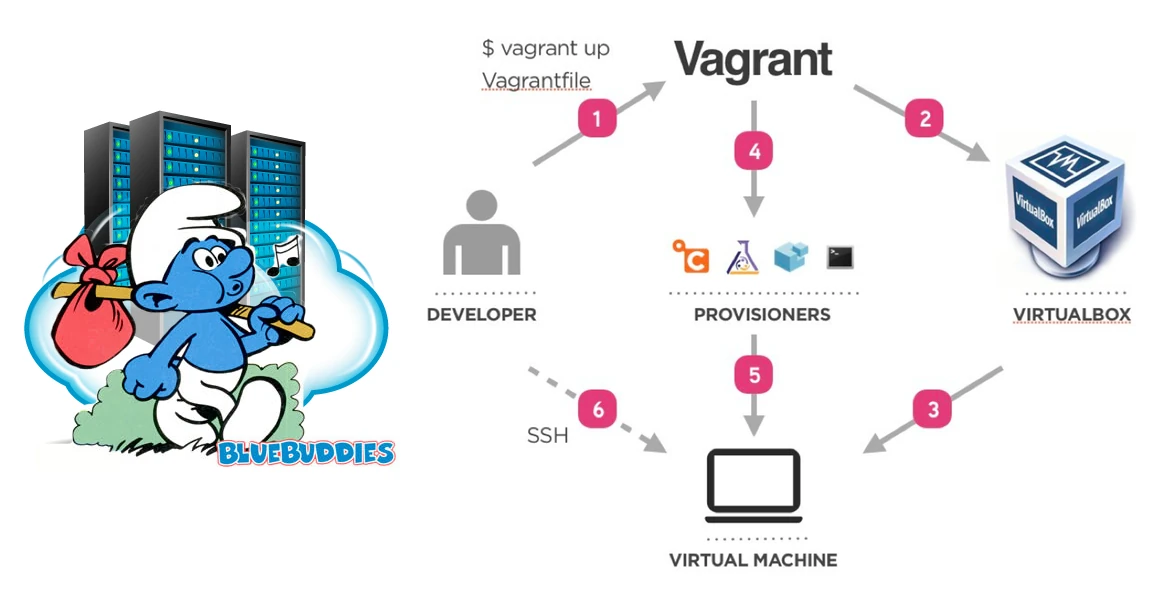
(The excellent visual diagram was found on DigitalForRealLife.com)
Your Personal Cloud
In order to learn Ansible, we need some machines to configure (some people call these “servers” but there is a reason for the differentiation).
Now, you could go to the local computer store and buy 5 machines, set them up, and you'd be good. Except that's pretty expensive, $1000+. Alternatively, you could go rent these machines from one of the many cloud providers for a cost of $10 per machine, per month. That costs less and is a great choice once your website, email, or other services are ready for use by customers. However, for learning, we can do things even cheaper.
Installing VirtualBox
VirtualBox turns your computer into a mini cloud. Your computer's resources can be subdivided among many virtual machines (“VMs”) that act similarly to a real machine, but without most of the hardware. VirtualBox is provided free of charge by Oracle for our educational purposes, and you will want to download and install it from VirtualBox.org, under the “VirtualBox platform packages” section.
Once you've done that, you're ready to run any of the many supported Operating Systems, including Windows, Linux, and more.
Installing Vagrant
Having VirtualBox installed to give us virtual machines is great, but it would take a lot of time and manual effort on our part to install and configure our operating systems. This will get especially tedious when we need to use more than 1 VM, we'll have to configure multiple machines by hand every single time! And, if we ever get stuck or want to start over, all of that work will be worthless. If only there was a way we could automate most
You're probably considering Ansible because it will automate the process of configuring your machines. Ansible is a great tool, but it requires SSH to run, so we're out of luck to use Ansible to install the actual operating systems in VirtualBox.
Enter Vagrant, which will create VMs in VirtualBox and install the requested operating system (among other things) all via the command line. This will make our lives so much easier.
To get Vagrant, head over to the Vagrant Website and download/install according to your platform (Mac, Linux, Windows, etc.)
Ensure Vagrant is installed by running the following command in a Terminal. You should see the version information.
$ vagrant --version
Vagrant 1.7.2
Initializing Vagrant and VirtualBox
Note: There are many ways to use tools and Vagrant and VirtualBox are not exceptions. There are plenty of things to configure, so for these tutorials, I'm going to intentionally slim things down and we can expand on things in later lessons. Even if you prefer a different configuration or operating system version, I'd suggest following along exactly with the tutorials so you get the hang of things first, and I'll be able to help you fix any problems. You can always change things up later 
Let's kick things off by starting a lengthy download. Run this command now, and let it work in the background while you follow along with the rest of this article.
$ vagrant box add ubuntu/trusty64
What this command does for us is tell Vagrant to download a fully installed and configured image of Ubuntu “Trusty” (v14.04) x64 for use within VirtualBox and other platforms. That's why it is cleverly named Vagrant.
Next, we need to initialize Vagrant. Create and use a clean directory wherever you like, and then run the following command:
$ vagrant init ubuntu/trusty64
This command will create a new file named “Vagrantfile” which has a bunch of configuration options for Vagrant and how it interacts with VirtualBox and other providers. We'll leave it as the defaults for now.
Now, we're going to run the VM in VirtualBox. In the same directory as the newly created Vagrantfile, run this command:
$ vagrant up
That's it! There is a new virtual machine create right before your very eyes, configured to work on your local computer and with VirtualBox. If you open VirtualBox now, you'll see the newly created VM.
You can access the new VM through SSH (the same technology that Ansible uses) by running:
$ vagrant ssh
We're ready to bring Ansible into the mix in the next lesson. in the mean time, check out these other Vagrant commands and experiment with them if you like:
$ vagrant status
$ vagrant suspend
$ vagrant shutdown
$ vagrant destroy